Thursday, December 30, 2010

Filled with Love

Did you know that Valentine's Day is the second biggest holiday for sending cards? I just posted my January Stamp Camp info on my website and we will be using items from this Filled with Love Stampin' Up promotion. From December 17, 2010 through January 24, 2011, get a FREE package of Bitty Buttons--a $4.95 value--when you purchase an exclusive Filled with Love Bundle. See details below.


I just love when Stampin' Up has bundle promotions it makes card making so easy!

Have a safe and Happy New Year!
Diane

Thursday, November 25, 2010

Fall Stamp Camp photos, finally!

Happy Thanksgiving all! I hope everyone had a good day filled with good food, family and friends. My husband is in retail and had to go to bed early tonight (8 pm) since the stores are opening soooo early tomorrow for Black Friday. I now have control of the tv. :)

Anyway, I have finally uploaded the photos from my Fall in Love with Stamping Stamp Camp and wanted to share. On this first card I used the set Trendy Trees. To get the "fall leave" effect, we colored the stamps with stampin' write markers starting with the lighter colors first then adding darker colors on top. Once we had all the colors we wanted on the stamp, we "huffed" on them with our breath to get the ink wet again and then stamped. I love how the trees turned out. The card base is Cherry Cobbler and I used a little twine to tie it all together.


For the next card I used the emboss resist technique again. It is really fun to do. Just get some glossy cardstock and have at it. I started by stamping the French Script stamp on the cardstock with black stazon. I then stamped the leaf images on the cardstock with versamark and covered with white embossing powder. After embossing the leaves, I took a sponge and rubbed More Mustard and Dusty Durango ink over the images. When finished just wipe the cardstock with a paper towel and it will remove any excess ink.


Here is the last share I have for you tonight. I used and old stamp set, sorry can't remember the name, but it is a 2 step lilac set. What I love about 2 step stamping is it is very forgiving as the images do not need to be placed exactly on each other.


Back to work tomorrow. I have some Christmas cards to post from my Holly Jolly stamp camp, but I'll save those for another day. Have a great night!

Diane

Sunday, October 10, 2010

Fall in Love with Stamping Stamp Camp

To all of you in the Katy, TX area. Please join me for my October Stamp Camp on Saturday Oct. 23rd from 2-5 p.m. We will be making 2 Fall cards along with a few "stock" cards that can be used throughout the year. Cost for the camp is $10. Bring a new friend and he/she can stamp for just $5. Place an order of at least $25 and take $5 off your Stamp Camp price. This is the perfect time to start thinking about Christmas cards for the holiday season and what you might need to get started. Please RSVP by Monday the 18th so I can get all supplies ready and cut. Hope to see you there!

Hope you are having a good holiday weekend!
Diane

Thursday, September 30, 2010

It's all about the Treats!

This past weekend I held my Happy Halloween Stamp Camp. We had a lot of fun. This is one of my favorite camps, because it is all about the treats! The first photo I am sharing is of the mini milk cartons we made. One was filled wit M & M's and the other with Candy Corn. The mini milk carton is a die cut available from Stampin' Up and is so easy to put together. Instead of sealing the top we just closed ours with a small binder clip decorated with a little ribbon.


This next little treat holder was made by putting two of the scalloped envelopes from the Scalloped Envelope die together. I got this idea from my fellow demonstrator and friend Pam. She had made this cute little treat holder and discovered that it perfectly fits a Reeses Peanut Butter Cup inside. She punched the envelopes with the word window punch to make the handle and tied together with ribbon. I decorated mine with a 3D pumpkin made with the 1 1/4" circle punch. Simply punch out 6 circles, fold in half and glue together. I just love it!


I have shown this next technique before, but I'm just in love with this slider idea! This treat holder holds a full size Hershey Bar. When you pull the ribbon it reveals the candy. The trick is to hole punch the top center of the holder and place ribbon through it so you have ribbon ends coming out the front and back. Place the candy bar on the ribbon and push down. Now tie the ribbon and voila!, when you pull the ribbon it lifts your treat!


This treat sack turns an ordinary lunch bag into a cute treat bag. The base is a regular lunch sack which I trimmed down and then scalloped punched the edge. Next I added an extra scalloped border in black. The bag was run through the Big Shot with the Spiderweb embossing folder. Neat huh? This is my version of the original made by Kirsteen Gill that I showed back on 9-11-10. Did you know that you can run napkins through the Big Shot and emboss them? Wouldn't some basic black or orange napkins from the dollar store embossed with spiderwebs be the perfect accent to your Halloween party? I think so! Anyway, this bag would be perfect for popcorn balls and a little candy for those special little goblins out there.


Have a great night!
Diane

Saturday, September 11, 2010

Halloween Treat Bag/Lunch Sack


Kirsteen Gill made this cute little treat bag for all of us to make at our shoebox swap. The base is a regular lunch bag ran through the Big Shot (113439) with the new Spider Web Textures Embossing Plate (120889). She then scalloped the top edge of the bag with our Scallop Edge Border punch (119882) and added another scalloped layer edge in black using our Scallop Trim Border punch (118402).

The tag added to the front uses the big tag from the Two Tags Die (115954) then she layered paper and rounded the edges. The stamped image comes from the new Fang-tastic stamp set (120853 wood). We then just used Stampin' Write markers and a blender pen to color the images.

These would make great treat bags for those special kids in the neighborhood. I remember when I was little my sister Jill's friends mom had special treats for her child's close friends that were different than just the regular candy passed to Trick or Treaters. I always looked forward to getting my treat from her. It is funny how something so small makes an impression on a child's mind.

I have the weekend off and my father is returning to Texas today after visiting my sisters. Should be a good weekend I hope yours is also!

Diane

Wednesday, September 8, 2010

Punch Art Pumpkin


Sharing some of our fabulous demonstrator's swaps again. This card was made by Carolyn Gray. The pumpkin punch art is made from the following punches: Oval Extra Large (119859), Word Window Large for stem (119857) and 5 Petal Flower for the leaves (118073). Other than the pumpkin the card is clean and simple, but has a lot of depth with the embossed background with the Square Lattice embossing folder (119976) and the sponged edges.

I chose the sentiment Happy Thanksgiving, but with the pumpkin this could be used as a general fall card or Halloween. Versatile and easy, just the way I like it!

Enjoy!
Diane

Sunday, September 5, 2010

Finally!


I have been wanting to make one of the Top Note character boxes since I saw them last year. I got the directions for this particular box from the blog Dream, Create and Share. If you click here you will go to her tutorial for the Frankie Top Note Box.

I changed mine up a bit as I did not have some of the punches she used. For the eyes, I used 1/2" circle punch for the black part of the eye, 1 1/4' circle punch for the white. I hand cut his hair with scissors in a random pattern instead of using a punch. I also used the 1/2" punch for the nose. My mouth was free handed with a Stampin' Write basic black marker. I am happy with the finished product. I had my husband buy me some 16 gauge Tie Wire from Lowe's which I used for the handle.


You can see it better on this picture of the back of the box. You will need some wire cutters and maybe a set of pliers to bend the ends up so they do not stick out in the box. If you are coming to my Happy Halloween Stamp Camp this is one of the projects we will be making. :)

Have a great evening!
Diane

Saturday, September 4, 2010

From the Crypt


I love all the details on this card. This is another shoebox swap card. (We had 15 swappers!) The background is embossed with the Square Lattice folder (119976). The next layer is a basic black strip with the Lattice die cut (115958) on top in purple. Next we placed the 1 1/4" Basic Black Striped Grosgrain Ribbon cinched together in the middle and attached to the card with brads. Lastly we stamped two images from the From the Crypt stamp set (115460) one stamped in black and the other in orange. We just cut around the images and layered them on the card. It is hard to see in the picture, but we added glitter to the black stamped image for a little bling.

Hope everyone has a safe and happy Labor Day weekend!

Diane

Friday, September 3, 2010

Wicked!


Here is another great Halloween treat from our shoebox swap. I really need to put more names with projects so I can give proper credit. This was not my idea, but I sure am going to copy it!

The treat holder was made from the Two Tags die (115954), using 2 of the big tags. Affix together at the bottom with sticky tape. The stamped images are from the Wicked Cool stamp set (118738) and the designer paper used is the Wicked Fun designer paper (117400). We used the Crop-a-dile to put a jumbo eyelet at the top where we used the new 1/2" lace trim (120988) to tie the treat together!


Here is a side view where you can see 2 fun size candy bars fit perfectly!

Thursday, September 2, 2010

Another project share


My friend Katherine provided this project for us all to make at the shoebox swap. Isn't it cute? I love how it takes a simple item that we all use every day, but dresses it up. It is perfect for your desk or just the right size to carry in your purse.


The happy thanksgiving stamp is a stamp from the set Falling Leaves (115368 which is a set of 9 for $21.95). The designer paper is from the new Holiday Mini and is called Autumn Spice (120808).

On another note, I am watching The People vs. Larry Flint and I forgot how hilarious Woody Harrelson was in this role.

Have a good night,
Diane

Wednesday, September 1, 2010

The Holiday Mini is here!!!


Yes it is that time again. Yipee! I just love the fall and start of the holiday season. The new Holiday Mini catalog was released today. If you would like to browse the pages, just click on my link to the right. You can then download the pdf version and view at your convenience.

The above card was made with the new French Foliage set from the Holiday Mini. Isn't it just beautiful? One of the things I miss most about living in Texas is the change of seasons and the beautiful fall foliage. This stamp set is a set of 6. It is available in wood (120845 for $19.95) or clear mount (121166 for $14.95). This was also a card we made at our demonstrator shoebox swap.

More to come tomorrow. Have a great afternoon!
Diane

Tuesday, August 31, 2010

Fang-tastic!


I just love this project. I believe this was designed by Danielle Adams at our demonstrator Shoebox Swap we had this past Sunday.

Danielle used the Bigz L Die - Mini Milk Carton (117310). Isn't this just perfect for Halloween treats? The milk carton is decorated with a strip of the specialty designer paper series Wicked Fun (117400), a bat punched with the new Bitty Bat Large Punch (119279) sponged around the edges with white craft ink, and held together with Basic Black 1/8" Taffeta Ribbon (119261).

I almost forgot, the sentiment is from the new stamp set Fang-tastic available in clear mount (121178) or wood (120853) starting tomorrow September 1st in the new Holiday Mini!

I'll be sharing more projects made at the swap in the upcoming days. Lots of good ideas for Halloween and fall card making.

Toodles!
Diane

Sunday, August 22, 2010

Saturday's Simple & Sweet Stamp Camp

I enjoyed having both old and new friends at this past Saturday's Stamp Camp. The theme was Simple & Sweet (though I might have to practice more on the simple part). Stamp Camps are great because we use many different stamp sets, punches, etc. and try techniques or use products that you might not have had a chance to get or use.

The first card I'm going to show you uses the new stamp set "Morning Cup" It is a coffee and tea theme based set and it is really cute. My friend Kiara loves coffee so I cased this card from Connie Babberts at Inkspired Treasures just for her. I did change the ribbon to 1 1/4" grosgrain tied with twine. I just love how she added the new basic rhinestones (150 per package for just $4.95) for a little added bling.


The next card was a card I received from our last demonstrator swap last month. It was designed by Elizabeth Hurst. If you have ever thought of joining Stampin' Up! and becoming a demonstrator give me a call or e-mail. Whether you join as a hobby demonstrator or to build a business, Stampin' Up! is fun for all. You will have to check back next weekend as I am going to another demonstrator event and will have lots of samples to share.

Elizabeth's card uses the "Artistic Etchings" stamp set. The card is made with two of our new colors Early Espresso and Marina Mist. Like the card above, we used the new Vintage Wallpaper embossing folder for the background layer. I also like the bling on the crown, maybe I should have called this camp Bling & Things? :) Ok, maybe not!


As I mentioned in my last post, I recently celebrated my 22nd wedding anniversary with my husband on the 13th. My coffee loving friend Kiara gave me a card to celebrate and told me to pretend she made it. It was lovely, but cost $3.99. I immediately said I could duplicate it, so I did!


Last but not least, I Cased this card from splitcoaststampers. It was also a submission for a sketch on the Clean & Simple blog. How ingenious is this? The card is made from a stamp from the "Trendy Trees" stamp set!!!! Now that is thinking out of the box. I stamped the image 3 times on different card stock, then punched it out with the 1 1/4" circle punch. I then attached to a candy stick and wrapped in a bag tied with 1/4" whisper white ribbon. The finished suckers are attached to the card with dimensionals. I just love the whimsical quality of this card.


Well school starts here in Texas tomorrow. Back to school zones and traffic. Summer was nice while it lasted. I'll be working on my shoebox swap card this week. Our theme is Halloween or Fall getting ready for September Stamp Camps.

Have a blessed night!
Diane

Sunday, August 15, 2010

Card for a Friend

When I lived in Edinburg, I worked with a guy whose name was Roli. He was a fun person to work with and always had something funny or quick witted to say. One of his favorite sayings, I incorporated into this card for him.


He has decided to go back to school and substitute teach. His last day at my old job will be Friday the 20th. I plan on sending this card to him.

Hopefully this will put a smile on his face. Images are from the internet, but paper and accessories are Stampin' Up.

:)
Diane

Saturday, August 14, 2010

Catching Up!

I have needed to catch up on my blog for a couple weeks now, but just hadn't gotten around to it. I held a new catalog open house at the end of July, my daughter got her driver's license on August 4th, I celebrated my birthday on the 7th and last but not least I celebrated my 22nd wedding anniversary with my husband last night. Whew!

To celebrate my customers and the new Stampin' Up! catalog, I held a new catalog open house where customers could come and go as they pleased and make 2 cards for free. This is the first card we made. It uses the new Artistic Etchings stamp set (118517 Wood or 120573 Clear). I used the colors pink pirouette, crumb cake and early espresso and distressed the edges for a more vintage look.


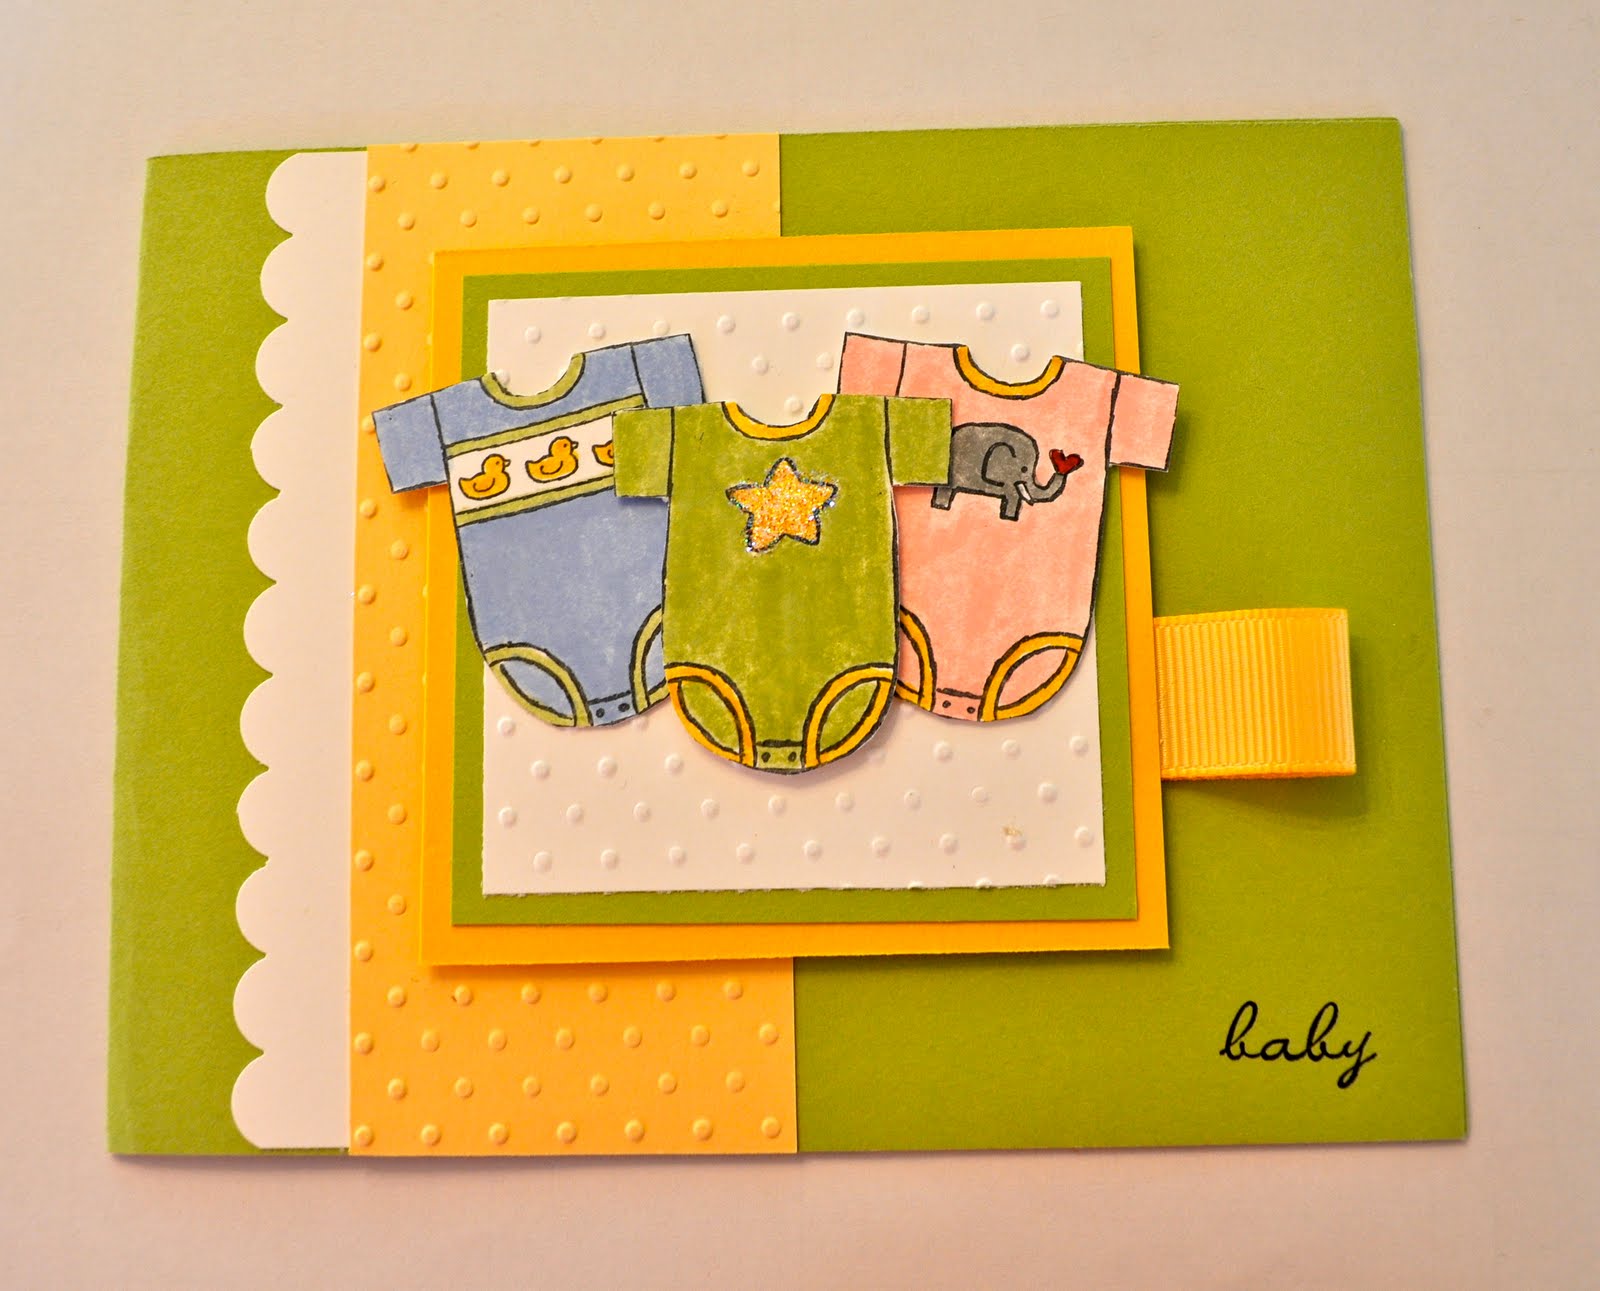
The second card everyone got to make for free was a baby card using the new Baby Tees jumbo wheel (118621). This was the first time many of the girls used the Stampin' Wheel to make a card. The wheels are great for decorating gift bags or big spaces as they are so simple to use. We cut out the 3 different baby tees and layered them on the card front with dimensionals. The card also uses the Perfect Polka Dots embossing folder (117335) and the Scallop Edge border punch (119882).


The following cards are from my fellow demonstrators of The Topics!. Penny my upline does a great job of keeping us "in the know" each month regarding birthdays, illnesses, births, etc and it is wonderful to get a mailbox full of cards when it is your special day. The top card is from Pam D'Urso, the bottom card is from Judy Sumner.


The card on the left is from Carolyn Gray, and the card on the right is from Judy Sumner.


Penny Thomas made the top card and Patty made the bottom card.


The butterfly card was made by Robin Owens and though the last card was store bought and not handmade it made me laugh. My good friend Jan sent me this. You just gotta love it!


Now that I am caught up, tomorrow will be spent making cards and cutting paper for my Simple & Sweet Stamp Camp which will be held next Saturday 8-21 from 2-5pm. We will be making 5 cards with a clean and simple theme. Want to come? Cost is only $10, please RSVP by the 18th so I can have enough supplies ready for all!

Hope you all have a wonderful weekend,
Diane

Saturday, July 17, 2010

Stampin' Up! Luncheon


Penny treated us today to a celebratory luncheon at Brookwood Community Center for promotions achieved in the Stampin' Up! year which ended June 30th. This is a photo of us all after lunch. Back row: Laurie, Amy, Faye, Penny and Tess. Front row: Kelly and myself.


Not only did we have a wonderful lunch and dessert, but Penny had the table decorated with name place holders and a gift bag filled with goodies. As an extra surprise, Penny gave each of us a pair of these fabulous flip flops that she dressed up with the Daisy Die Cut and Build a Brads decorated with a Circle Circus stamp. I have been admiring hers from her blog and had been wanting to make some. Thanks Penny!!!!


The gift bag included a Color Coach, decorated box with antique brads inside and another small box with 9 small 1" or so gift tags, perfect for attaching to our own gifts.

I stumbled upon Penny by the grace of God when I moved to Houston. She is a wonderful upline, but more than that, a wonderful friend.

Thanks again for a beautiful Saturday!

Diane

Tuesday, June 29, 2010

Sweet Summer Time Stamp Camp Creations

I hope everyone is enjoying their summer. It is hard to believe it is almost July already! I just wanted to show you the cards we made at my last stamp camp. I tried to keep to a summer theme. The first card below could be used for a wedding gift card or an anniversary. It was so simple to make as we used the Elegant Note (116450, 15 for $9.95) cards and punched out the design. We then just added burgundy paper to the back and dressed it up with some butterflies and a flat backed pearl.


I CASED this card from "The Queen's Scene". The layout was from a challenge she completed. I changed up the colors and stamp set. This was a favorite of a lot of the gals from the stamp camp. I have to admit that I even like it, even though it is blue. (Nothing against blue, I just prefer other colors) The girls had their first experience with 2 step stamping. Two step stamping is really a fun way to add depth and color to your images. It doesn't have to be right on, so it leaves room for individuality.


What is summer without some ice cold watermelon? I found this card on splitcoast stampers. I think it was originally made in 2007 with pink and lime green. I changed the colors up, but kept the layout the same. The watermelon slices were made with the 1 3/8 and 1 1/4 circle punches. The seeds were hand drawn on the melons.


I remember when we first came to Texas. We were living in Kingsville and somewhere between there and Corpus Christi was a field of sunflowers. It was so beautiful! I had my husband stop and I went into the field and took pictures. This card reflects my love for sunflowers. The images are Stampin' Up, but I don't recall the name of the stamp set. The sentiment is from the new stamp set Vintage Vogue.


The last card we made was this cute little popsicle card. This is a CASE of a card that Jennifer Jackson made in July of 2009. Once again I found it on splitcoast stampers. I just love looking at everyone's creations. We used the cherry from the Tart and Tangy stamp set and stamped on the card front with Versamark. Versamark makes your stamped image just a little darker than the color you stamp on, kinda like a watermark. The popsicle was made with the tag punch (119866),the bite mark was made with the scallop punch (119854) and the popsicle sticks were made with the word window punch (119857).


Of course Stamp Camp wouldn't be fun without my stamping friends. Here is a picture of a couple of the gals who came last Saturday - Kiara and Judy. We had the best time. There is always room for more so check out my upcoming events and hopefully we will see you there!


Happy stamping!
Diane

Sunday, June 20, 2010

Arts and Craft time at the Lodge

Ok, so it really isn't a lodge, but a little green cabin in the woods in Northern Minnesota on Pelican Lake and the town of Orr, population 269. We have been vacationing at my parent's summer cabin since we were newborns, some 42 years ago. As children we didn't like it because we do not have electricity or running water, which means we have an outhouse and a sauna for bathing. As adults we can't spend enough time relaxing in the north woods.

This summer I was lucky enough to be able to spend a week at the cabin with my dad and my sister Beth. As my sister Beth lives in Indiana and I live in Texas, we don't get to see each other often, so we had a great time together. When we knew we would be there at the same time we began planning some card making time. I brought all my left over card supplies from stamp camps and I think we were able to make 7-8 different cards. (I think the supplies took up at least a third of my suitcase, but well worth it for the daily arts and crafts sessions)


As you can see lighting was limited in the cabin, but that didn't deter us. We used gas lanterns and also these little battery operated light bulbs for light closer to our work area. The first morning we got up at 6 am to make cards! I don't even get up that early everyday for work!


This must have been an early morning as Beth has her coffee cup on the table. I didn't bring a paper pad to stamp on so we improvised and used paper towels. Stamping is so much fun we didn't even care.

This last picture is of Beth with all the cards we made over the week. We did give a stack to my Aunt June who also has a cabin on the lake (a really nice log cabin where they spend about 10 months of the year) as she had invited us up one night for a movie and popcorn. We gave her the cards as a small thank you gift.


Well it's back to work tomorrow, but looking forward to Stamp Camp on Saturday for more stamping fun!

Diane

Wednesday, May 26, 2010

Graduation Matchbox


Isn't this the cutest thing ever!? My friend Penny posted this on her blog today. Please hop on over there and check it out. She got the idea from Stampin' Up's Stampin' Connection where demonstrators share their creations. I can't wait to make my own!!

Click HERE to go to Penny's blog.

Tuesday, May 11, 2010

Card Therapy Stamp Camp Card Shares

This past Saturday was a blast at my Card Therapy Stamp Camp. We started off the camp with chicken enchilada dip and syrup hotdogs ( hot dogs wrapped in bacon placed in a crock pot and covered with brown sugar). While the girls ate I gave an overview of the 5 cards we were making that day. The first item we made was this cute ladybug Petal Card holder. I just love the Petal Card die cut because you can do so many things with it. My photo displays the holder with a gift card inside (perfect for those June graduates), but I also had fun size candies available to place inside. The ladybug punch art was an item I found on Angie Juda's blog. She consists of 2 - 1 3/8 circles, one red and one black. Cut the red one in half and sponge with black on the edges. The head is a 1' circle punch and the spots are punches from a small hole punch. The antennae were made from some twine colored black with the Stampin' Write markers.


I just can't get enough of the Sweet Scoops set which is available in the new Summer Mini catalog. This is the second card we have made with it, but I just adore it! Instead of a traditional cone I used the sugar cone and made mine a double dipper! The brown background was embossed with our new Square Lattice embossing folder. Doesn't it give the texture of a waffle cone?


This card is a CASE of a card I found on the blog Pine is here. The stamp set, card stock, designer paper and ribbons are different, but the concept is the same. I ordered the Ribbon Originals 116230 Masterpiece specifically to make this card. I love how Stampin' Up offers these ribbons together for sale. The saying "Live, Laugh & Love" is from the stamp set On Your Birthday 111664. We simply inked the stamp with our black Stampin' Write marker, leaving off the happy birthday. Using your markers to ink your stamps allows you to use your creativity with color and what words you would like to use.


Getting ready for Father's Day, we made this card with the Totally Tool stamp set. This idea was CASED from splitcoast stampers where several people have made cards using the tools placed on paper that was paper pierced to look like peg board. Though this card was time consuming, I don't know a dad out there that wouldn't appreciate a handmade card from his son or daughter for Father's Day.


Last, but not least, we made a card for those animal lovers out there. Using the stamp sets C is for Cat and D is for Dog we made a simple birthday card. This card is a direct CASE from the catalog page 61. I did make the card a full 5 1/2 by 4 1/4. The buttons are sewn on the card using the paper piercing tool and some white embroidery thread.


I am catching up on some card requests, and getting ready to head to work. I hope you all have a wonderful day! Stay tuned for the next Stamp Camp date, I hope to see you there!

Diane